Raglan Top Sewing Pattern
Today we will be discussing the Raglan Sleeve Top Pattern 2a from Simple Modern Sewing. This stylish and comfortable top is perfect for any occasion and can be made in a variety of colors and patterns. In this post, we will provide a detailed description of the top, materials needed, pattern sizes available, and step-by-step instructions on how to create it.

Description
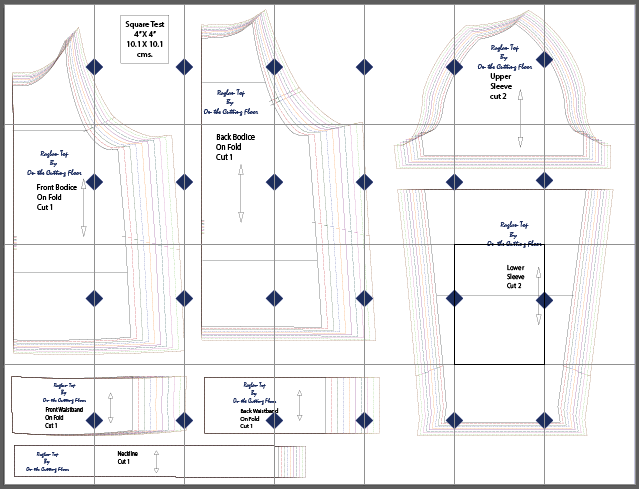
The Raglan Sleeve Top Pattern 2a from Simple Modern Sewing is a comfortable and stylish top that features raglan sleeves, a relaxed fit, and a slightly curved hemline. The top is designed to be made with knit fabric and has a finished length that falls just below the hips.
The top is available in sizes XXS to XXL and comes with detailed instructions that are easy to follow. The pattern is designed to be printed on standard 8.5 x 11-inch paper and includes all necessary markings and notations to ensure a successful project.
Materials
To create the Raglan Sleeve Top Pattern 2a, you will need the following materials:
- Knit fabric (see pattern for yardage requirements)
- Sewing machine and thread
- Scissors
- Pins
- Ruler or measuring tape
- Fabric marker
- Iron and ironing board
It is important to use a knit fabric for this project as it will provide the desired drape and stretch needed for the top to fit properly. A jersey knit or interlock knit would be a good choice.
Pattern Sizes
The Raglan Sleeve Top Pattern 2a is available in the following sizes:
- XXS
- XS
- S
- M
- L
- XL
- XXL
It is recommended to choose your size based on your body measurements rather than your ready-to-wear size, as sizing can vary greatly between brands and manufacturers. Be sure to measure yourself accurately and refer to the pattern sizing chart for guidance.
How To
Now it's time to start sewing your Raglan Sleeve Top Pattern 2a!
- Print out the pattern and tape the pieces together according to the instructions.
- Cut out your fabric using the pattern pieces and following the grainline markings.
- With right sides together, pin and sew the front and back pieces together at the shoulder seams using a stretch stitch or a narrow zigzag stitch.
- Next, pin the sleeves to the armholes, matching the notches and easing in any excess fabric. Sew in place using a stretch stitch or a narrow zigzag stitch.
- With right sides together, pin and sew the underarms and side seams all in one seam, from the sleeve cuffs to the hemline. Use a stretch stitch or a narrow zigzag stitch for this step.
- Turn up the hemline 1/2 inch and press with an iron. Then turn up again by another 1/2 inch and press again. Pin in place and sew the hemline using a stretch stitch or a narrow zigzag stitch.
- Finally, finish the neckline by either using a coverstitch machine, sewing on a knit binding, or a narrow zigzag stitch.
And that's it! With these simple steps, you can create a comfortable and stylish Raglan Sleeve Top Pattern 2a that is perfect for any occasion.
Thanks for reading and happy sewing!

Post a Comment for "Raglan Top Sewing Pattern"